
Havasu Falls

HAVASU FALLS
Near Village of Supai , AZ
Image by Don Metz @ www.donmetzphotography.com
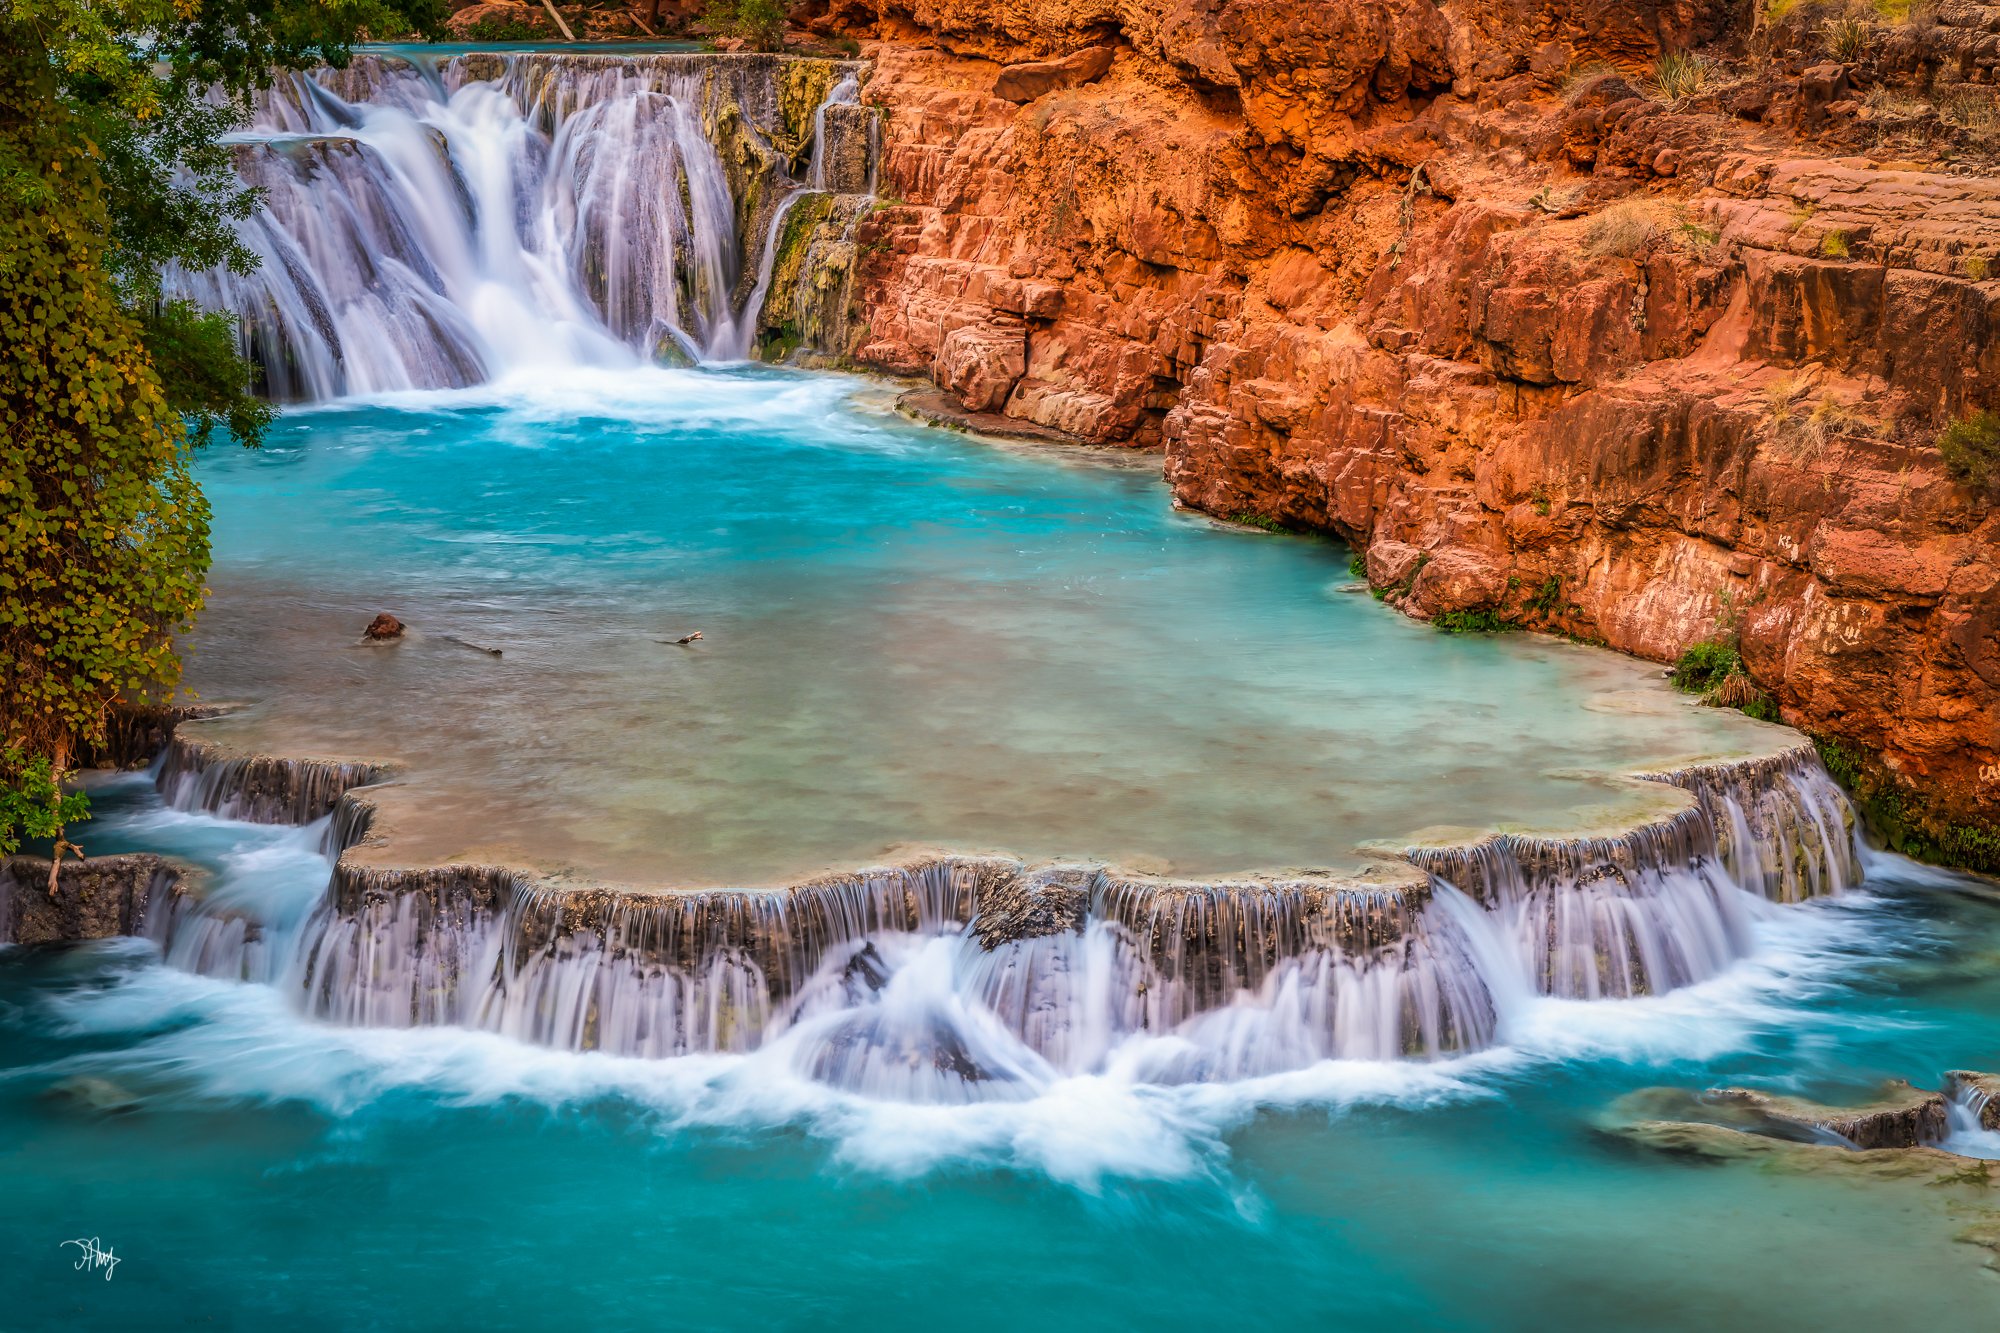
Havasu Falls is an iconic waterfall noted for its remarkable aquamarine waters created by high concentrations of calcium carbonate in the spring-fed Havasu Creek.
The journey to Havasu Falls is truly an adventure to experience in addition to capturing idyllic photographs of a unique ecosystem.
These mineral deposits are suspended in the water and reflect light creating beautiful green and blue hues. The calcium carbonate also builds the travertine formations that coat the waterfalls and produce numerous cascades along the entire length of Havasu Creek until its confluence with the Colorado River.
Photos and location summary by Don Metz.
Havasu Falls is one of the most beautiful places in the American Southwest. However, it is not a place you simply drive to, hike for a while, and start shooting. There is a great deal involved including permits, camping/lodging, food, water, understanding and respecting your tribal host & their principles, and the difficulty of the hike.
Don Metz has put together one of the very best comprehensive guides I have ever seen for all things Havasu Falls (including planning, permits, lodging, hiking, etiquette, gear/equipment, and photographic considerations). The Photographing Havasu Falls - A Comprehensive Planning Guide can be found at the Kindle Store on Amazon. Don is a professional photographer, an extensive traveler, and is a contributing partner for Photographers Trail Notes.
- Tim Wier
Trail Difficulty - DIFFICULT
I would rate the difficulty of this trail as a 4 t0 5 on a scale of 1-5 (with 5 being most difficult) - depending on the time of year and your fitness level. The hike from the Hualapai Hilltop to Supai and then to Havasu Falls is 10 miles each way - with an elevation gain/descent is about 2,500 ft. If you choose to go on to Beaver Falls, it is another 2.5 miles. Thus, the round trip is 20-25 miles or more, depending on your other walking adventures in the canyon.
THIS HIKE IS NOT FOR EVERYONE and you should research all aspects of the hike before considering going.
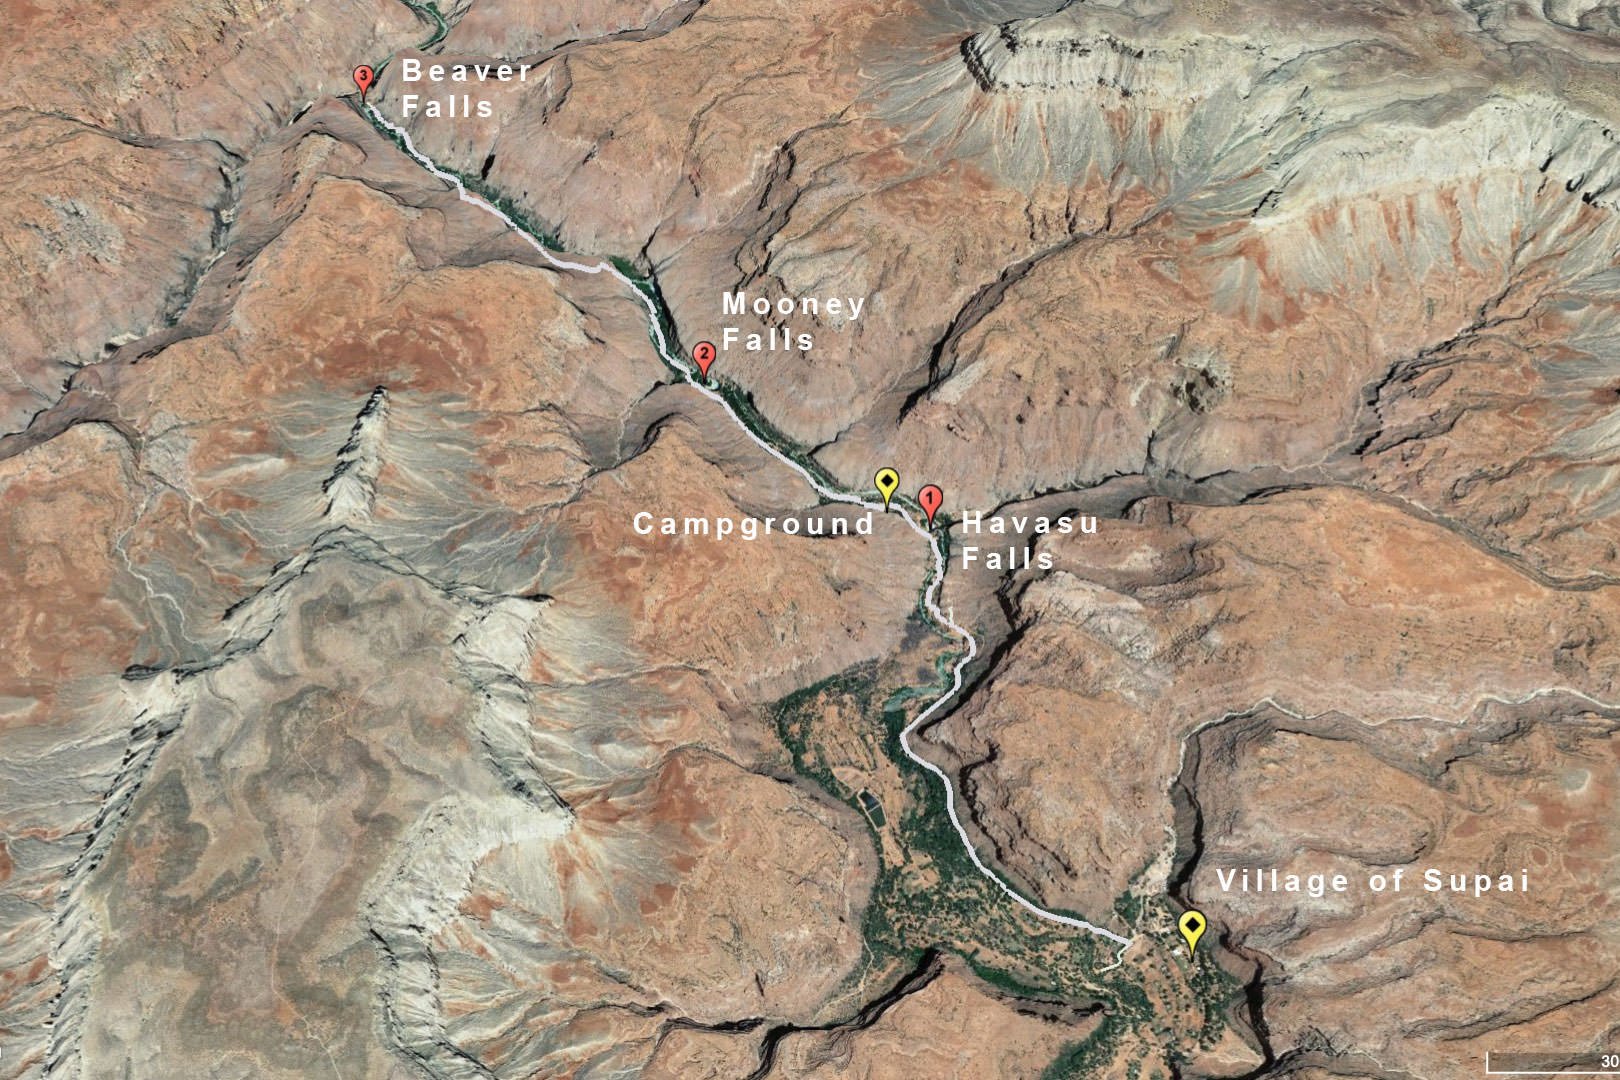
GPS Coordinates & Elevation
36°15'18.9"N 112°41'52.9"W - Havasu Falls
36°15'48.5"N 112°42'33.8"W - Mooney Falls
36°16'55.1"N 112°43'47.6"W - Beaver Falls
2,200 - 2,600 ft. Elevation
Google Earth
Download KMZ Trail File
Click Here to download the KMZ file for this location.
Directions
CLICK HERE to get driving directions to Hualapai Hilltop (parking area for Supai Trail to Havasu Falls)
From Flagstaff, AZ - take I-40 W for about 70 miles to Seligam, AZ. Then follow Historic Rte 66 for 29.5 miles until you come to Indian Rd 18. Turn right and travel 29.1 miles until you get to the Hualapai Hilltop parking area.
From Kingman, AZ - take Historic Rte 66 for 57.3 miles until you come to Indian Rd 18. Then take a left and drive 29.1 miles until you get to the Hualapai Hilltop parking area.
To Supai and Havasu Falls - from the Hualapai Hilltop parking area, you can either hike or take a helicopter to the Village of Supai. The hike to Supai is 8 miles with a 2,000 decent and is rated difficult to extreme - depending on the time of year and your fitness level. From Supai - it is another 1.5 miles to the Havasu Falls, then another 1/2 mile to the campsite. From the campsite it is 1/2 miles to Mooney Falls and then another 2.0 miles to Beaver Falls.
Photography Tips
Working around other people and watching the light throughout the day are the two principal variables you need to constantly monitor. Essentially, every visitor to the falls is a photographer even though many are only equipped with a smartphone. Since the canyon is deep and surrounded by sandstone, the reflecting light changes constantly and is either amplified or muted depending on cloud cover.
Other Images From This Location
Best Time of Day to Shoot
You can shoot the falls any time of day. The falls and the water generally look best during the day as sunlight or reflected sunlight emphasizes the teal-blue color of the water. Late morning and late afternoon offer opportunities to capture light reflecting off the canyon walls and illuminating the falls. Sunrise and sunset can be challenging without direct light but could provide interesting opportunities if there are clouds that turn color (which is not very often).
Best Time of Year
The falls offer photographic opportunities any time of year (as long as the falls are open). Spring begins in March and April with new leaves on the foliage. Fall colors occur in November peaking during the last two weeks just before the falls close for the season.
Lens(es) Needed
The Havasu Falls canyon is relatively narrow which naturally limits some of the photographic compositions. For most classic and iconic photos of the falls, you can use a medium wide-angle lens such as a 24-70mm or 24-105mm lens. If you want the flexibility for telephoto close-ups you may want to opt for a teleconverter lens to save weight. If you like taking wide-angle photos you may want to bring a 14mm or 16mm wide-angle prime lens rather than a wide-angle zoom to save weight.
Birds-Eye View From Google Earth Pro
Permits
The Havasupai Nation strictly enforces the number of visitors visiting Havasu Falls - and there are the only two methods for visiting Havasu Falls (day trips are not allowed) - camping or lodging. Both can be cumbersome to expensive ranging in price from $350 to $2,000.
I would strongly suggest extensive research on the process before considering this adventure. One of the very best comprehensive guides to all things Havasu Falls (including planning, permits, lodging, hiking, etiquette, gear/equipment, and photographic considerations) is the Photographing Havasu Falls - A Comprehensive Planning Guide by Don Metz. Don is a professional photographer, extensive traveler and contributing partner for Photographers Trail Notes. The guide can be found at the Kindle Store on Amazon.
Equipment Needed
Havasu Falls is different than almost any place you will visit in the American Southwest. There is only one way in and only one way out, there are no electrical outlets available and you have to pack in everything you will need for 4 days and 3 nights (food, clothing, sleeping and personal items and photography equipment).
In other words from a photography standpoint, you need to only bring what you need. There are three key considerations for deciding what equipment to bring: 1) weight of the gear, 2) the canyon is relatively narrow which naturally limits some of the compositions, and 3) it’s all about the water.
For most classic and iconic photos of the falls, a 24-70mm or 24-105mm lens will work. If you want the flexibility for telephoto close-ups you may want to opt for a teleconverter lens to save weight. If you like taking wide-angle photos you may want to bring a 14mm or 16mm wide-angle prime lens rather than a wide-angle zoom to save weight.
A tripod is essential since most of the photographs are of flowing water. To save weight use a sturdy carbon fiber or lightweight aluminum tripod and ball head that packs small. This is particularly important for the hike to Beaver Falls where you must traverse a narrow tunnel (more on this later). Since the canyon is narrow there aren’t many panoramic compositions, so you can leave the pano-rail home.
Filters are important. A high-quality circular polarizing filter is essential to capture the flowing water and eliminate glare off the water. Neutral density filters may be helpful, but you’ll find the narrow canyon is naturally darker, so it won’t be difficult to stop the shutter down to a ¼ second or slower even on sunny days. A graduated neutral density filter is helpful if you plan to take wider shots that include the sky, especially in the afternoon when the upper section of the canyon is lit by the sun. HDR bracketing is also effective if you don’t want to bring additional filters.
Bring extra batteries, storage cards (in a waterproof case), shutter release cable, and microfiber cloths. You’ll be hiking through water when you go to Beaver Falls so bring waterproof stuff sacks to store the accessories, camera body, and lenses.
Number of Other Photographers to Expect
As mentioned, Havasu Falls is different than other places you will photograph in the American Southwest.
The canyon is relatively narrow with limited compositional opportunities and you will be sharing these locations with up to 350 others looking to enjoy the wonderful surroundings and capture that iconic image.
Many people will be looking for their Instagram moment and you will need to patiently respect their right to be there, regardless of how inane some of their antics are (although it does make for some fascinating people-watching). More importantly, the Instagram effect on the canyon has resulted in a significant number of visitors who lack respectful spatial awareness or outdoor etiquette. Be prepared for people trying to get their Instagram moment to crowd your camera, bump your tripod, or simply walk in front of you while they get their shot. I’ve observed some testy exchanges between people who have been careless around a photographer’s equipment or are simply disrespectful by planting themselves in front of the camera (sometimes for a long time) without even bothering to ask if the photographer was finished with their shot. My advice is to focus your photography of the major waterfalls during off-peak hours in the early morning or late afternoon (which are generally better times for reflected light anyway) and be patient during the day – the crowds will get in the way.
Weather
The area around Havasu Falls is a high desert climate with elevation changes from 5,200 ft at Hualapai Hilltop to around 2,200ft at the falls. The temperatures can vary up to 30° - 40° a day. Spring and fall are nice, but summer can get into the high 90s. This area of the Grand Canyon has fairly large swings in temperature from mid-day to evening. In the summer, the days can be very hot, and the evening can be mild to cool.
Cell Service
Cell service is available at the Hualapai Hilltop parking area, the Village of Supai and in a narrow area at the top of Havasu Falls. Any other cell signals are hit and miss.
Overnight Camping Options
As mentioned, there are only 2 options for staying at Havasu Falls: 1) camping or staying in the Havasu Falls Lodge. Both are expensive and can be very difficult to secure.
The process for securing a campsite is like a lottery with many rules and restrictions and the sites for the entire year fill up in the first few hours of availability - February 1st @ 8:00 am each year. If you are not completely ready for reserving a camping site before February 1st, your chances of staying at the campground are very limited.
I would suggest extensive research on the process before booking a campsite. The Photographing Havasu Falls - A Comprehensive Planning Guide by Don Metz in a great resource for all things lodging at Havasu.
Camping
Havasu Falls Campground (reserve campground reservations)
requires 3 nights and 4 days at $350 per person (2021 rates are likely to change)
Lodging
Havasu Falls Lodge (reserve lodge reservations)
2020 prices are $440 per night plus $110 per person entrance/environment fee.
Nearby Restaurants
There are limited options for food/snacks/drinks in the canyon. Either the Sinyella Market and Café in the Village of Supai or food tents near the top of the falls (frybread, burgers, tacos, and drinks). The food at the Sinyella Market and Café are very good but expensive.
Area Guides and Workshops
None
Other Resources
Photographing Havasu Falls - A Comprehensive Planning Guide) by Don Metz. The guide can be found at the Kindle Store on Amazon.